Sunday, March 29, 2009

Bridal Pillow Finished


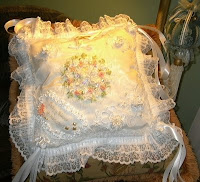
This is a bridal pillow that I have designed and made for a friend who has her grandson getting married in Mexico.
I was asked to make a larger pillow than normal so it could be used later so this one is twelve inches in diameter excluding the lace.
My largest challenge was the names. I ended up placing them on fine linen and then bordering them with hand rusched bridal satin and dotted them with pearls. I then went in and added some rosettes and floating hearts.
Most of the silk ribbon work in the centre fills a six inch diameter spot and has some teardrops added to the large ribbons 15 and 35 mm and small hearts as well as pink/blush 7 mm gathered roses and 7 mm over dyed green ribbon for leaves. I then used a green and added baby's breath and used mill hill beads to put on the end.
I also added beads to the bridal motifs then were added and added different collages of lace and beads to them as well as silk ribbon roses in large with floating teardrops.
The large six inch lace section is gathered and pleated by hand and attached from the back, with pearls securing it to the pillow top.
Swags of bridal satin ribbon are held onto the four corners with satin rosette ribbons and beads.
The pillow inside is made of batiste and the moire' is also back with the same batiste fabric so this pillow can be used after the ceremony.
Small bridal satin ribbons hold the rings on and floating hearts fall from the centre know with a cascade of pearls.
I do hope the new bride to be enjoys this pillow as making a larger than normal one for me was a bit challenging.

Bridal Pillow

Corner of bridal pillow with name cross stitched with metallic threads and surrounded by bridal satin and beads.

Tuesday, March 17, 2009

Block Four and final Block


This is the final block in the series. I had originally covered all of the seams in the brown wildflowers threads with very long stitches so had to remove them gently.
I will take a break from this one until after work today and then decide on how to work with this.
I have added another little face to the block, but she probably won't stay on this one, but one doe not know until they get moving along. I have to remove the brown stems or do something creative with them as well. I am also not sure that the green and gold braid is staying as I would like to curve this and do some rusched ribbon work so it blends with the rest.
Have a great day stitching.


The lady block is done in the gold block series. I have one more to do and this will be finished. I like the way she turned out and had a difficult time deciding on what to do to make her stand out, but not stray away from the other blocks and the bottom piece of metallic gold and black lace lead the way, the silk ribbon work above softened her. I would put a face on a block again.

Monday, March 16, 2009

Face Mold

When designing the third block in my gold series, I had a plant pot with vines coming from it and then one of the quilters online asked for some examples of face cab use and I decided to try and see what I could do with a simple one. I am very pleased with how she turned out and this is the first one that I have actually worked with detail on the face.

I had purchased the small faces from "Leslie " and wanted to work with them as I use them in my beaded flowers. Click on beadwork and you can see them in my blog. I received these one's glazed and at first did not know where to take them from here, but now must admit that I like the glaze as it gave me the opportunity for self shading.

I first took the cab and highled the face with two coats of nude nail polish., lingerie coloured or whatever shade you like. I then took some pigma pens and did the eyes, eyebrows ( which I would change in the next one ), outlined the lips in a deep red, ( must get some suttler shades ) and then went back in and highlighted the lips and eyes in black. I felt she had a vintage look to her.

I then took an eighteen piece of 7mm over dyed ribbon and cut six inches off. I first gathered along one edge and and kept this close to the top of the cab for a full hair. I then gathered the other twelve inches and lowered the placement and tacked it around the cab. This cab is held on with double faced tape as if I decide that I want to, I can now go back in and add an adhesive, but I am pleased with the soft feel of double faced tape without the hardness of glue and the fact that I did not have to bead around this particular face. I then added a little bead each side for ear rings, add a fluff of feather to the top and a deep rose with a pearl.

As the vines were already stitched I had to decide what to do for the background so I chose a sort of Mother Nature attempt and did beaded lilacs ( in other words groups of four and five beads clustered on the ends), and went back in with a darker green thread and worked leaves and sprigs. I feel she is as finished as I want her to be on this block as I do not want her to take over the block as it is only six inches. I hope to work more on this one today.

Saturday, March 14, 2009

Second Gold Block


Friday when I went to finish this block the bower of roses changed my theme of sticking with a small pink flower on every block. I wanted to move out a bit more. I am still keeping with using up small amounts of things I have saved. For example the tatting was a design that never did make it anywhere else, but it did fit well on the project. I also scrunched some gold toned ribbon and collages beads. I did cut the dangling cluster of beads that was hanging as it did not look like it belonged. I love the little fairy hiding under the beads and used some special sequins from my friend. I have one more block laid out and and fourth one to pull some stitches out of and then I can proceed further. I am truly enjoying this challenge.

Thursday, March 12, 2009

Gold Block


I picked another block from a little stash that I had prepieced to do a purse for and decided to work on this to see if I could get the sttiches back in line again as it has been so long since I did seams and silkribbon work.
I never throw anything away. The wild rose at the top left is a small piece of 17mm hand dye that was cut into thirds, each was gathered separately and then added as if the wild rose was with large petals, the little white beads added to this. I also took a piece of green that highlighted this and it also was a leftover and cut it in two and did a loop stitch and tacked it under for leaves. I had previously started to work bead work on a large piece and tossed it into a bead box and pulled this out as it seemed like a nice accent on the rose piece. Another piece of ribbon came out just as I was about to rusche a piece of off white ribbon and it was satin brown, it went beautifully into a bow. The heart button and the dangles were saved from a project that they did not work on before. I just re threaded them. On a purse I would leave them dangling on a block I secure them down. I have now laid out another gold block as I have had four of them waiting to be worked on for about a year now and see what develops.

Tuesday, March 10, 2009

Pink, beige and white Block 6" square


I found this a very soothing block to work on. As you can see from a previous post I have removed the rose and put a fluted flower with a beaded pistil lop at the end of the gathered and rusched ribbon. I also removed the flower with the white in it, as it was taking over the block. I like how the little bouquet of roses adds to the design in the middle and the bleached wooden buttons fade out as if the little dragonfly is going to land on them.
I will have to place a new work in progress on my table so that I can start something new to work on. I do want to do the Piecemakers block, but want to warm up a bit with some smaller ones.

Playing with Colours


This is a block that I made as a spare and now I have taken and started to work on this one.

I love the suttle colours and a touch of pink just seems to add to the beauty of this block.

I have the Piecemakers pattern for this year and wanted to start the large quilt and take away from the black in the background and perhaps I have innocently stumbled upon a colour that I can work with other than the blacks, greys and whites. I love the concept of the quilt and also love the layout, but when I look at all of the dark colous in it it makes me feel cold. I know it is out of darkness as it rises from the ashes. A picture of the quilt I hope to start on this week is at http://www.piecemakers.com/ and is not only a quilt but a calendar as well. I have started collecting butterflies to keep putting onto the quilt.

Labour of Love Gift Block


This block was created for a friend and hopefully when this one arrives there will be more so that she can have a wall hanging or prayer quilt.

I chose suttle colours and was going to stay with a suttle theme and that did not work. I felt compelled to keep working and working on this block and now it is time for it to start it's journey home.

I truly enjoyed working on this one, and have started to work on a second one that I am going to set aside and allow it to motivate me to keep stitching.