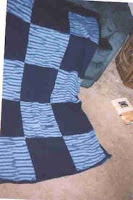
Here are several charity blankets that I have knit on the ISM knitting machine, but they can also be done by hand, and have edged with crochet.
ISM Knitting machine on Keyplate 3.5 or 4. Hand knitting needles would be metric 5.5 or us 6.
Materials - 3 - 100 gram balls solid colour ( navy )
3 - 100 gram balls verigated colour ( blues )
Crochet hook sized "F" or 4.5 or knit in garter stitch.
Knit four panels, joining as you go or they can be hand joined later by slip stitch or crochet.
Using waste yarn cast on 45 stitches..
Knit 6 rows.
Change to navy and knit 50 rows.
Change to verigated and knit 50 rows.
Continue in the above manner until you have a total of 6 squares. Cast off loosely.
Make a second strip identical to the first.
Make two more strips but start with the verigated navy and then change to navy.
You will have knit a total of six panels. Either join as you go on the machine and or slip stitch
the seams together, matching the squares.
Edge around with a single crochet and work 3 single crochets in each corner. Repeat round with a double crochet, and finish with one more row of single crochet. This keeps all of the sides flat.
Block and allow to set.
Enjoy............ This is a great scrap yarn project.........as you can change each time you run out of yarn and make a very colourful lap afghan or childs blanket.
-----------


